Continuous Integration using JENKINS & how to install it on AWS EC2 instance


What is Continuous Integration?
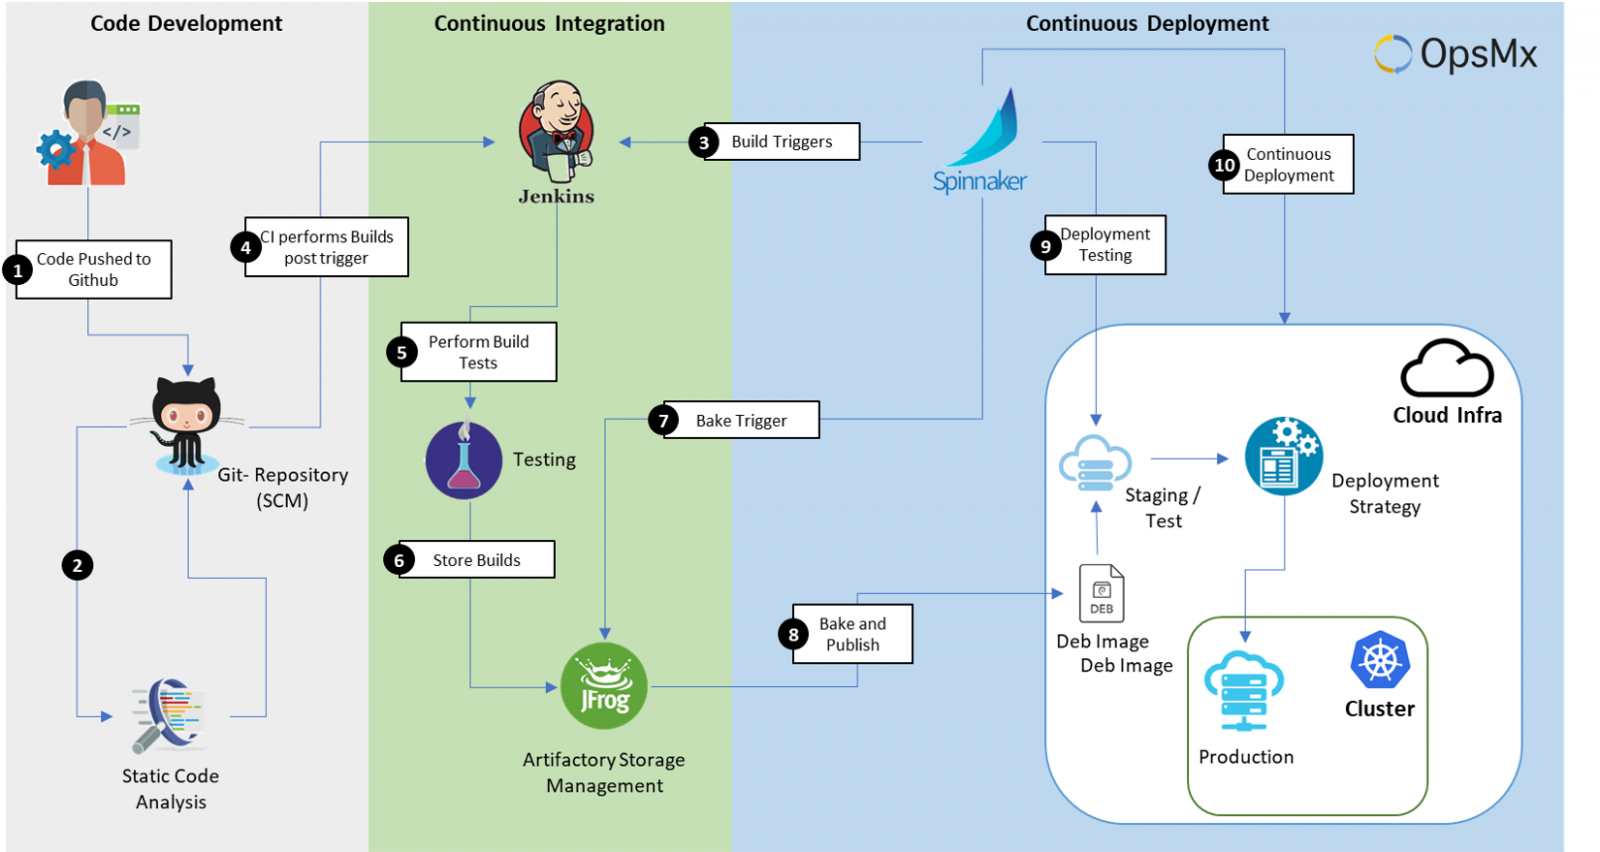
It is a procedure where developers commit code to a shared repository on a regular basis. Version Control System is being monitored. When a commit is detected, a build will be triggered automatically.
The typical version control systems that are used are Github and Gitlab.
Why do we need Continous Integration?
A DEVOPS engineer needs to find out problems or bugs in the code as early as possible. In the development life cycle, it is important to fix the code bugs as early as possible so that the overall sprint process is not hampered.
The entire code base is integrated, build and tested constantly. The potential bugs and errors are caught earlier in the life cycle which makes the process easier.
What is JENKINS?
Jenkins is a tool that is used for automation, and it is an open-source server that allows all the developers to build, test and deploy software. It works or runs on java as it is written in java. By using Jenkins we can make a continuous integration of projects(jobs) or end-to-endpoint automation.
Stages of code pipeline in JENKINS.
Stage 1:
There are no build servers. The code is developed and commited on a regular basis. The changes are integrated and tested manually. There are as compared as fewer releases in this stage.
Stage 2:
In this stage automated builds are scheduled on a regular basis. In this stage the build script compiles the application and runs a set of automated tests. In this stage the developers now commit their changes regularly. The build servers would alert the team members in case of a build failure.
Stage 3:
In this stage a build is triggered whenever new code is commited to the central repository. In this stage the broken builds are usually teated as high priority issue and are fixed quickly.
Stage 4:
In this stage automated code quality and code coverage metrics are now run along with unit tests to continuously evaluate the code quality.
Stage 5:
This is the final step in which automated deployment takes place.
Difference between Continuous Integration, Continuous Delivery & Continuous Deployment
Continuous Integration
It is the practice of merging the deployment work with the main branch.
Continuous Delivery
It is the continual delivery of a code to an environment once the code is ready to ship. This could be staging or production. The idea is the product is delivered to a user base, which can be QAs or customers for review and inspection.
Continuous Deployment
The deployment of release of code to production as soon as it is ready.
JENKINS Master-Slave Architecture
Master is used to scheduling the build the jobs, dispatch the jobs to the slaves for the actual job execution, monitor the slaves and record the build results and can also be executed to build the jobs directly.
The slave is used to execute build jobs dispatched by the master.
Installing JENKINS on AWS EC2 instance
Login to the AWS Management console and navigate to EC2 dashboard and click on Create Instance.
Choose the Amazon Machine Image as Ubuntu Server.
![How to install Jenkins on EC2 instance [Step-by-Step]](https://www.golinuxcloud.com/wp-content/uploads/ubuntu-ami.png)
Now, leave the rest as default and click on Create. The EC2 Instance gets created successfully.
![How to install Jenkins on EC2 instance [Step-by-Step]](https://www.golinuxcloud.com/wp-content/uploads/jenkins-instance-created.png)
Now we need to connect to the EC2 instance for that select the created instance and connect it using the EC2 Instance Connect or through the SSH Client.
![How to install Jenkins on EC2 instance [Step-by-Step]](https://www.golinuxcloud.com/wp-content/uploads/connect-1.png)
The connection got established successfully.
![How to install Jenkins on EC2 instance [Step-by-Step]](https://www.golinuxcloud.com/wp-content/uploads/ssh-jenkins.png)
Now we will install Jenkins on the EC2 instance. For that we need to put the following commands on the terminal.
We use the Debian package repository of Jenkins to automate and upgrade the installation. To use this repository, add the key to your system.
wget -q -O – https://pkg.jenkins.io/debian-stable/jenkins.io.key | sudo apt-key add –Now, add the following Jenkins apt repository entry in the apt sources.
 sudo vi /etc/apt/sources.list
 deb https://pkg.jenkins.io/debian-stable binary/
![How to install Jenkins on EC2 instance [Step-by-Step]](https://www.golinuxcloud.com/wp-content/uploads/edit-sources.png)
Update the apt manager sources.
 sudo apt-get update

 Hit:1 http://us-east-1.ec2.archive.ubuntu.com/ubuntu focal InRelease
 Get:2 http://us-east-1.ec2.archive.ubuntu.com/ubuntu focal-updates InRelease [114 kB]
 Get:3 http://us-east-1.ec2.archive.ubuntu.com/ubuntu focal-backports InRelease [108 kB]
 Get:4 http://us-east-1.ec2.archive.ubuntu.com/ubuntu focal/universe amd64 Packages [8628 kB]
 Get:5 http://security.ubuntu.com/ubuntu focal-security InRelease [114 kB]
 Ign:6 https://pkg.jenkins.io/debian-stable binary/ InRelease
 Get:7 https://pkg.jenkins.io/debian-stable binary/ Release [2044 B]
 Get:8 http://us-east-1.ec2.archive.ubuntu.com/ubuntu focal/universe Translation-en [5124 kB]
 Get:9 https://pkg.jenkins.io/debian-stable binary/ Release.gpg [833 B]
 Get:10 http://us-east-1.ec2.archive.ubuntu.com/ubuntu focal/universe amd64 c-n-f Metadata [265 kB]
 Get:11 http://us-east-1.ec2.archive.ubuntu.com/ubuntu focal/multiverse amd64 Packages [144 kB]
 Get:12 http://us-east-1.ec2.archive.ubuntu.com/ubuntu focal/multiverse Translation-en [104 kB]
 Get:13 http://us-east-1.ec2.archive.ubuntu.com/ubuntu focal/multiverse amd64 c-n-f Metadata [9136 B]
 Get:14 http://us-east-1.ec2.archive.ubuntu.com/ubuntu focal-updates/main amd64 Packages [1400 kB]
 Get:15 http://us-east-1.ec2.archive.ubuntu.com/ubuntu focal-updates/main Translation-en [283 kB]
 Get:16 http://us-east-1.ec2.archive.ubuntu.com/ubuntu focal-updates/main amd64 c-n-f Metadata [14.7 kB]
 Get:17 http://us-east-1.ec2.archive.ubuntu.com/ubuntu focal-updates/restricted amd64 Packages [616 kB]
 Get:18 http://us-east-1.ec2.archive.ubuntu.com/ubuntu focal-updates/restricted Translation-en [88.1 kB]
 Get:19 http://us-east-1.ec2.archive.ubuntu.com/ubuntu focal-updates/universe amd64 Packages [884 kB]
 Get:20 http://us-east-1.ec2.archive.ubuntu.com/ubuntu focal-updates/universe Translation-en [193 kB]
 Get:21 http://us-east-1.ec2.archive.ubuntu.com/ubuntu focal-updates/universe amd64 c-n-f Metadata [19.9 kB]
 Get:22 http://us-east-1.ec2.archive.ubuntu.com/ubuntu focal-updates/multiverse amd64 Packages [24.8 kB]
 Get:23 http://us-east-1.ec2.archive.ubuntu.com/ubuntu focal-updates/multiverse Translation-en [6928 B]
 Get:24 http://us-east-1.ec2.archive.ubuntu.com/ubuntu focal-updates/multiverse amd64 c-n-f Metadata [616 B]
 Get:25 http://us-east-1.ec2.archive.ubuntu.com/ubuntu focal-backports/main amd64 Packages [42.0 kB]
 Get:26 http://us-east-1.ec2.archive.ubuntu.com/ubuntu focal-backports/main Translation-en [10.0 kB]
 Get:27 http://us-east-1.ec2.archive.ubuntu.com/ubuntu focal-backports/main amd64 c-n-f Metadata [864 B]
 Get:28 http://us-east-1.ec2.archive.ubuntu.com/ubuntu focal-backports/restricted amd64 c-n-f Metadata [116 B]
 Get:29 http://us-east-1.ec2.archive.ubuntu.com/ubuntu focal-backports/universe amd64 Packages [18.9 kB]
 Get:30 http://us-east-1.ec2.archive.ubuntu.com/ubuntu focal-backports/universe Translation-en [7492 B]
 Get:31 http://us-east-1.ec2.archive.ubuntu.com/ubuntu focal-backports/universe amd64 c-n-f Metadata [636 B]
 Get:32 http://us-east-1.ec2.archive.ubuntu.com/ubuntu focal-backports/multiverse amd64 c-n-f Metadata [116 B]
 Get:33 http://security.ubuntu.com/ubuntu focal-security/main amd64 Packages [1069 kB]
 Get:34 https://pkg.jenkins.io/debian-stable binary/ Packages [21.0 kB]
 Get:35 http://security.ubuntu.com/ubuntu focal-security/main Translation-en [197 kB]
 Get:36 http://security.ubuntu.com/ubuntu focal-security/main amd64 c-n-f Metadata [9096 B]
 Get:37 http://security.ubuntu.com/ubuntu focal-security/restricted amd64 Packages [566 kB]
 Get:38 http://security.ubuntu.com/ubuntu focal-security/restricted Translation-en [80.9 kB]
 Get:39 http://security.ubuntu.com/ubuntu focal-security/universe amd64 Packages [668 kB]
 Get:40 http://security.ubuntu.com/ubuntu focal-security/universe Translation-en [112 kB]
 Get:41 http://security.ubuntu.com/ubuntu focal-security/universe amd64 c-n-f Metadata [13.0 kB]
 Get:42 http://security.ubuntu.com/ubuntu focal-security/multiverse amd64 Packages [21.9 kB]
 Get:43 http://security.ubuntu.com/ubuntu focal-security/multiverse Translation-en [4948 B]
 Get:44 http://security.ubuntu.com/ubuntu focal-security/multiverse amd64 c-n-f Metadata [540 B]
 Fetched 21.0 MB in 4s (5553 kB/s)
 Reading package lists... Done
Install JDK on Ubuntu now.
sudo apt-get install openjdk-8-jdkInstall Jenkins on the Ec2 instance now.
sudo apt install jenkinsNow in last, we will configure Jenkins. Once Jenkins gets installed into the ec2 instance, open a browser on your local machine and enter the URL- x.x.x.x:8080, where x.x.x.x is the public IP address of the virtual machine. A screen gets displayed where you need to enter the administrator password to unlock Jenkins.
To find the administrator password use the following command
sudo cat /var/lib/jenkins/secrets/initialAdminPasswordLog in using the Administrator password and install the suggested plugins.
All the suggested plugins get installed in the Jenkins environment.
![How to install Jenkins on EC2 instance [Step-by-Step]](https://www.golinuxcloud.com/wp-content/uploads/2021-12-26_23-04-14.png)
After installing the suggested plugins, you can create the first admin user.Once you create the user, you can start using the Jenkins environment.
![How to install Jenkins on EC2 instance [Step-by-Step]](https://www.golinuxcloud.com/wp-content/uploads/jenkins-ready.png)
Now you can create your first JENKINS job. One can start building a project by creating a job.
![How to install Jenkins on EC2 instance [Step-by-Step]](https://www.golinuxcloud.com/wp-content/uploads/create-a-job.png)
Enter the item name and select the Freestyle Project.
![How to install Jenkins on EC2 instance [Step-by-Step]](https://www.golinuxcloud.com/wp-content/uploads/item-name.png)
Select the Source code management as Git and enter the Repository URL of your code.
![How to install Jenkins on EC2 instance [Step-by-Step]](https://www.golinuxcloud.com/wp-content/uploads/scm.png)
Add the build step as execute through shell, and enter the following command to execute the HelloWorld program.
javac HelloWorld.java java HelloWorld![How to install Jenkins on EC2 instance [Step-by-Step]](https://www.golinuxcloud.com/wp-content/uploads/build-step.png)
Finally, click on Apply and save the project. Now, click on build and the project starts executing. You can see the status of the execution in the Build History, below the dashboard.
![How to install Jenkins on EC2 instance [Step-by-Step]](https://www.golinuxcloud.com/wp-content/uploads/2021-12-27_01-54-35.png)